Posts

Final Evil Eyeball Designs.... F.E.E.D for short

Image
HIGH QUALITY RENDER COMING THROUGH Here are their close ups (with less shiny) King and Queen Bishop and Rook Knight and Pawn

Hell week? hell week.

Image
Life can be hell when you don't manage time very well. Speaking of hell, that's my inspiration for the first sketch I made but let me show you the wack ones first: The Idea for this one was "an outline of each shape offseted then do the same thing again in another direction and boolean union together" concept for the top one: made out of 6 different shapes and as the hierarchy lowers, one shape is taken away concept for the weird line one: using lines to create the shape, they're small and ring sized or something. Here's the best concept I have, according to my speed dates: EVIL DEMON EYEBALL ALIEN   My peers liked this concept the most. Some feedback I got were: Spirals would be cool but there are a lot of spiral inspired pieces, especially on the internet Use the actual size of an eyeball  No anime eyes Instead of giving them a satanic symbol on their "crown", make them look evil Here's what I started: eye...

From thinking "I wanna make a minimalist ring cuz i hate wearing Bulky rings" to creating a "Wearable Sculpture"

Image
I wasn't sure at first on what to design to make especially rings since I don't wear a lot of them and I like non bulky rings but then I find them too boring so I just sketched whatever went through my head.  THE SKETCHES      I had to choose three concepts out of nine that I sketched for critique. FINAL THREE CONCEPTS During the peer-to-peer discussion, my group mentioned how they would like to see my designs in an organic manner. Instead of using extrusions, I need to use pipe. So that's what I did for my final design. I used my third concept and improved it to make it more organic and interesting. Flat on the ground Drew on 2D then changed the control points to lift petals After using the Flow command and changed color of material Now it was time to check it on Shapeways and see if I have any problems with it. The first time I did this was bad. The flower parts were all in red so I re-did the petals and made them thicker...

"Fan"ally finished!

Image
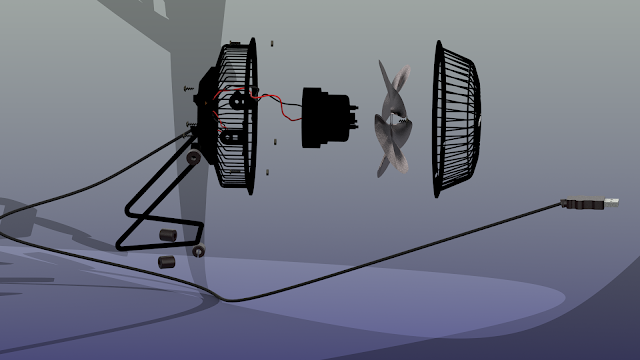
The fan is finished! Rendering takes forever and my render looks awful, I'm not sure what happened there. In the process of modelling the wires, I accidentally detached one of them so the fan doesn't work anymore and when I try to reassemble it, I couldn't so R.I.P fan. exploded version 1 exploded version 2 assembled version 1  assembled version 2 assembled version 3 assembled version 4 This project really made me think on how and where I should start. Lots of brain storming on how to create a specific thing from simple shapes.

None of this is easy at all but at least I'm learning

Image
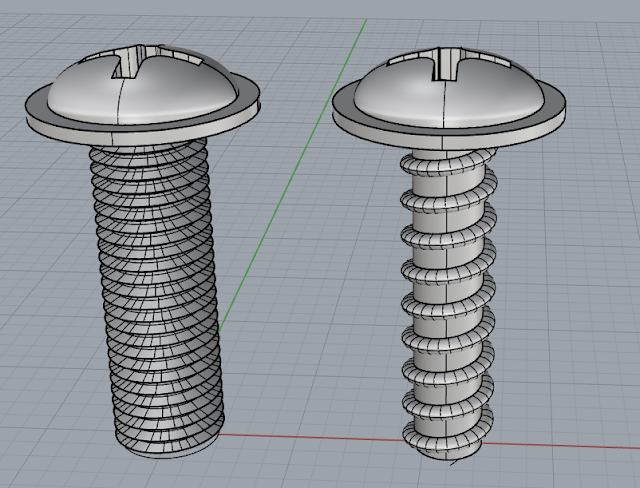
So there is a quicker way of making screws. I deleted the old ones and made new ones. Check out the differences: left - new version; right- old version left - new version; right - old version After re-making the screws, I started making the fan cover. At first, I thought it would be easy because it looks like it's just a bunch of pipes, circles and lofts but man, was I wrong. This is what I have for now. What I'm trying to finish for this blog. My next problem

Making screws makes my screws loose

Image
I dismantled my fan today after arriving home from Thanksgiving dinner. There were not a lot of parts as I thought there would be. Since I don't want to lose the tiny parts, I decided to measure them first. Here is the best sketch I've ever done for this class: Another reason why I chose to model the screws first is because I remember from last year, there were Youtube tutorials about modelling screws in Rhino. They used older versions of the software but I know it still works. There's probably a faster way to do it especially with Rhino 6 but I'll just follow what the channel's doing. Modeling Screw Threads (part 1) Modeling Screw Threads (part 2) With these tutorials I was able to make SCREW C and SCREW A. I did the screw threads first because it was harder than making the top. Then I used "Sphere" and "Split" it in half for the top part. After making the screws, I did the nuts. It was pretty easy but there was a challenge, p...

Eeny Meeny Miny Mo, Which Object Should I Manually Digitize?

Image
I don't really own a lot of things that are dissectible and interesting so I chose objects that I can disassemble for the second project of this class. For this project, I have to use Rhino to "reverse engineer" an item that I (well maybe not just me, Bryan's also going to choose) selected.  Among the three items, I choose the box cutter knife mainly because it's the flattest item in the selection and as a person who is afraid of challenges and not being able to get a great mark, I think I can model it on Rhino in, or hopefully before, due time. But it's the lamest among the three, to be honest. The mini desk fan would probably be a pain but humans should always face their fears and challenge themselves in order to improve. So I guess my final item would be the desk fan. All I need now is to find a screwdriver so I can actually disassemble the fan. The nail cutter is just there because it's mechanical and I can't find anything else. ...