Posts

"Fan"ally finished!

Image
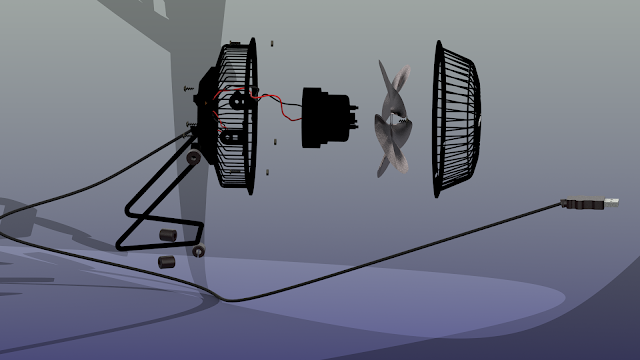
The fan is finished! Rendering takes forever and my render looks awful, I'm not sure what happened there. In the process of modelling the wires, I accidentally detached one of them so the fan doesn't work anymore and when I try to reassemble it, I couldn't so R.I.P fan. exploded version 1 exploded version 2 assembled version 1  assembled version 2 assembled version 3 assembled version 4 This project really made me think on how and where I should start. Lots of brain storming on how to create a specific thing from simple shapes.
None of this is easy at all but at least I'm learning

Image
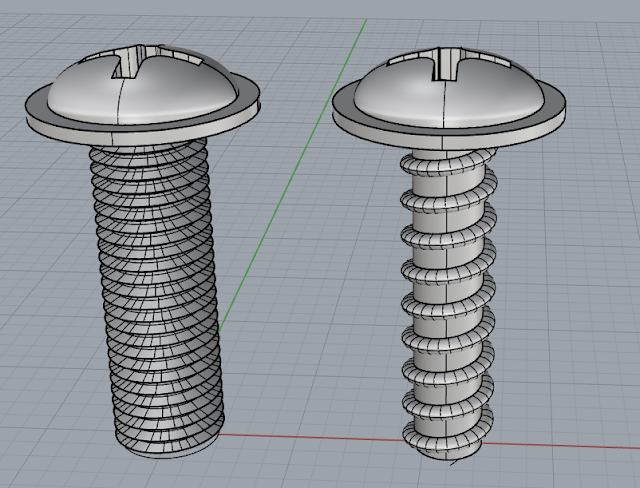
So there is a quicker way of making screws. I deleted the old ones and made new ones. Check out the differences: left - new version; right- old version left - new version; right - old version After re-making the screws, I started making the fan cover. At first, I thought it would be easy because it looks like it's just a bunch of pipes, circles and lofts but man, was I wrong. This is what I have for now. What I'm trying to finish for this blog. My next problem

Making screws makes my screws loose

Image
I dismantled my fan today after arriving home from Thanksgiving dinner. There were not a lot of parts as I thought there would be. Since I don't want to lose the tiny parts, I decided to measure them first. Here is the best sketch I've ever done for this class: Another reason why I chose to model the screws first is because I remember from last year, there were Youtube tutorials about modelling screws in Rhino. They used older versions of the software but I know it still works. There's probably a faster way to do it especially with Rhino 6 but I'll just follow what the channel's doing. Modeling Screw Threads (part 1) Modeling Screw Threads (part 2) With these tutorials I was able to make SCREW C and SCREW A. I did the screw threads first because it was harder than making the top. Then I used "Sphere" and "Split" it in half for the top part. After making the screws, I did the nuts. It was pretty easy but there was a challenge, p...

Eeny Meeny Miny Mo, Which Object Should I Manually Digitize?

Image
I don't really own a lot of things that are dissectible and interesting so I chose objects that I can disassemble for the second project of this class. For this project, I have to use Rhino to "reverse engineer" an item that I (well maybe not just me, Bryan's also going to choose) selected.  Among the three items, I choose the box cutter knife mainly because it's the flattest item in the selection and as a person who is afraid of challenges and not being able to get a great mark, I think I can model it on Rhino in, or hopefully before, due time. But it's the lamest among the three, to be honest. The mini desk fan would probably be a pain but humans should always face their fears and challenge themselves in order to improve. So I guess my final item would be the desk fan. All I need now is to find a screwdriver so I can actually disassemble the fan. The nail cutter is just there because it's mechanical and I can't find anything else. ...

Ring Around the Rosie

Image
Back when I was younger, I hated flowers but that changed when I graduated high school. Flowers are the main inspiration for the final form of the Surface Design. Most of the interesting designs I found are the ones i found online, like these: I mostly used "Control Point Curve" for this project. My first shape was half an eye shape then I used "Mirror", "Rotate" and "Move" so I can join them together and make two copies and scaled them bigger than the original. I used "Hatch" to add in the lines and color. For the internal pattern, I did it with the "Control Point Curve" and made topographic lines. After all that, I used "Polar Array" to achieve this: I copy and pasted the previous form then I used "Scale" and "Rotate" a few time to achieve the form I want. I almost lost my sanity doing this, not knowing when to stop but eventually I did.  CHALLENGES...

eye spy with my little i, a castle that can't reach the skeye and a lady who barely remembers how to use Rhino

Image
I do remember the basics of Rhino but do I remember ALL of the basics? Nope. The idea behind my castle was an eye. First thing I did was drawing a shape of an eye using "Control Point Curve" and extruded it to which it became the outer wall of the castle. I wanted to make this outer wall thicker but I don't remember how and I wasn't in the Wednesday help time. This castle has 3 walls... ...unnecessary walls. For the inner wall, I used "Torus" in order for the wall to have density. I wasn't really thinking about this and I could've used "Circle", extruded the curve and then un-"capped" it so it would look more like a wall like what I did with the actual castle. But people make mistakes and I just realized it while I'm making this blog. This inner wall has a parabola-ish shaped gate. I used the "Cube" then "Fillet" the edges and used "Cylinders" to complete the look. Now, for...

THE LAST DAY!

For the last class, we printed using a Ceramic 3D printer. I was pretty amazed at how fast it was however when you make a design, you really need to think about the possibility of your form to collapse. So Sara, one of my team mates, had to re design our concept.  Going to the printer, I didn't even realize that it would be inside the ceramic studio. I used to have a class there and I never saw it. There were also printed forms in there made by other students.  Here is the hyperlapse printing of our concept! I can't believe I totally forgot to post my final blog post for this class. It was really fun and with this class I decided to minor in Object Design and Fabrication. Creating a design can take hours, days, weeks, and can be frustrating but once you get the design printed and there's no problems, it makes you feel accomplished. I learned that in order to to make your design work, critiques are important and asking for help is also valuable. Being ...